|
For the longest time, I though of Canon Glass as very expensive with lenses like the the 24-70 f2.8 L which is currently $2,299 at B&H and the 70-200 f2.8 for 2,499 at B&H. So looking around on Ebay, I found some very cheap lenses comparatively. So here are some alternatives I found to save you a few thousand dollars.
70-200mm F2.8 Canon L IS II USM Lens - $2,499 vs. Tamron - $559 Savings - $1940 24-70 f2.8 Canon 24-70 f2.8 - 2,299 vs Canon 28-70 f2.8 - $642 Savings - $1657 17-55mm Canon 17-55 f2.8 - $879 vs Tamron 17-50 f2.8 - $225 ^ I'm doing a review of the Tamron Soon Savings - $654 Buying used lenses or just older lenses doesn't alway mean a drop in quality but it always means a drop in price. And if your just getting started and want to build up a collection of some nice lenses... This seems like the way to go. It can even be a better value than buying vintage manual prime lenses. For a start, you could get the 17-50 Tamron for $225 which is about the same as the kit lenses brand new. Then you could expand to either the Tamron 70-200 (total of $784) or get a Tokina 11-16 f2.8 for $449 (total of $674). Both options are very cheap way to get solid glass from a wide area of focal lengths.
0 Comments
I think that was just what I needed some of my favor filmmakers talking about filmmaking stuff and just saying what they thought and how the future of digital film is going to be. If you have Netflix, I'd highly suggest you watch it.
*Disclaimer- I have never sold a film before so this is just information that I have found online, but you probably should base your entire distribution on this article, if you have any advice or experience with Distribution please share in the comments bellow. * Step 1) Get your Film EverywhereThe first thing I noticed was that many people were suggesting to try to get on as many platforms as you possibly could. This is definitely a good idea to do. It gives people options and will attract a few new viewers which is always a great plus. Step 2) Go to the right places at the right timeTry and leverage each part of the film distribution system. This will help you maximize your income from the film. While sometimes it works out for people to skip levels but usually it is best to stick with the Distribution Levels; Distribution Levels
Other Tips
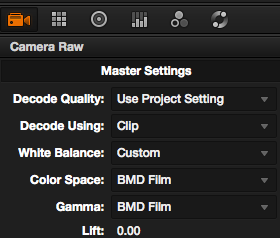
Raw video has been all the rave and with magic lantern, we can use raw video with the cameras we have. While it may not be the best setup, I'll talk about that in a minute, It's a great way to learn skills you would need for Raw video shooting. Before I begin to talk about my review, I'd suggest you check out my video of some shots I got with RAW video bellow. About the VideoAbove Video Camera Settings;
So for the above video this was my workflow; Workflow - So I got my 2 minutes and 18 seconds of footage and using RAWMagic converted it to .DNG files. The RAW files were 2.68GB, which is 1.23 GB per minute. So a 16GB card could roughly record 13 minutes of footage. That may sound like a lot but it isn't horrible for RAW recording. (It's due to the lower resolution which I used 1024x440) Then once it was converted to .DNG it took up 3.06 GB and the same space as ProRes out of Davinci. I then color corrected and graded in FCPX.
The Actual ReviewSo the RAW footage definitely has more Dynamic Range. However it has much more noise than footage from H.264. Which could be the reason for the Color Grading being about the same as Cinestyle. It also has roughly the same detail as the H.264 mode, however this may also be due to the noise. Another drawback is that it crops into the sensor. This is a bit annoying so If you plan to make any significant amount of videos with it, you will need wide lenses. Another thing is that once and awhile it will have some odd purplish or other color flicker or digital artifacts, so you have been warned. So while it's not something you'll want to use daily due to the massive files or use on a professional shoot because of lower resolution, more noise, and digital artifacts, it's a great tool to learn more about RAW Workflow and get better at color correcting so that one day when you get to a project you want to shoot with a RED Epic or Blackmagic Cinema Camera, You'll know how to handle the files already.
Recently we created a short film with one of our friends and to our surprise, he was an amazing actor. Just goes to show that anyone you know could be willing to help and add a lot to your films. Night Shooting Also this was our first shoot in night and in the rain. Which to my surprise went amazing. The only light other than lighting from the environment was a CN-160 LED light. Which was awesome. Thanks to it being battery powered was the whole reason we could shoot this film. Rain We also used just a hose from the location and pointed it up fairly high to create a rain look and then in post added some sound effects. To keep the equipment dry, I put ziplock bags over everything. Conclusions All in all, the short film seemed to have a bit more production value than our previous work. So just keep in mind that night shooting and rain can have awesome effects and aren't always a nightmare to work with. Anyways, Check out the Clip. I wanted to help my audience out, you guys. And to create a bit more of a community and some feedback, so I decided to create a submit a film where you can submit your films for articles on this site. Hopefully some of you guys take advantage of this opportunity to reach a bigger audience. So thanks for reading my blog. -Zach PS here's a recent reel I made for my production company.... Other things to note: DSLRguide's 5000 subscriber contest here |
Zachary WillZachary Will is an Award-Winning Filmmaker creating short films and content for the Internet as the owner of Riverside Studios. He has a Bachelor's in Film from Full Sail University. He has worked on productions for companies like Webmd, Sears, Home Depot, Six Flags and more! "the trick is to never give up... I think the secret of success is not how little you get knocked down but how often you get back up." - Gareth Edwards Archives
February 2019
|
||||